How to make a dress pattern with a one-piece sleeve. Dress with a one-piece sleeve - who suits and style options
On the page, a variant of the phased construction of the basis of the shoulder product of the dress with one-piece sleeve and modeling the neckline, see Figure 9. The drawing is built without darts and seam allowances.
Using this technique for constructing a drawing, it is possible, without changing the base pattern, to prepare it for cutting on fabric and sew a simple, comfortable nightgown. Or model many other various products (dress, blouse, windbreaker).
To build a drawing of a pattern, in addition to correctly taken measurements, it is necessary to take into account the allowances for free fit, which are determined by the type of product or model and create the silhouette of the product. Also, the additions provide freedom of movement and an air gap between the clothes and the body.
Rules for taking measurements for dress patterns.
For details on how to take measurements correctly, see. And to build a drawing of the basis of a shoulder product with a one-piece sleeve with a height of 158 cm, see table 1 below.

Step-by-step drawing of a dress pattern
The figure of a person is quite symmetrical, as a result of which the drawing of the back and front is built at half the width of the product. We start the construction with a base grid, which consists of the following construction lines:
- Vertical line of the middle of the grid
- Horizontal lines of the shoulder, bottom.
Basic grid - figure 1
In the upper part of the workspace we build a rectangle. Its two vertical sides will correspond to the length of the product.
AN And A1H1= 80 cm
Side AN on the drawing shows the line of the middle of the pattern.
The horizontal sides are equal to the value calculated by the formula: to measure the half-girth of the chest ( Pog) you need to add an increase to the chest ( Pg) and divide the result by two:
AA1 And HH1= (Pog + Pg)/2 = (47.6 cm + 6 cm)/2 = 26.8 cm
Opposite horizontal sides on the grid in the drawing will correspond to: AA1 with shoulder line HH1 bottom.
The contour of the front pattern differs from the back only in a deeper neckline, so the front and back are built simultaneously on the same basic grid.
The neckline of the back and front - pictures 2 and 3.

Neck width ( Shg), back and front.
On the base grid along the shoulder line from the point BUT you need to set aside the width of the neck to the right ( Shg), calculated by the formula: (half circumference of the neck divided by three) plus an increase in the width of the neck is equal to (see below) and put a point IN 1.
(Shg) = AB1 = ((Posh) / 3) + (Pshg)) = (18.1cm / 3cm) + 1cm = 7cm
Neck width ( Shg) is equal to the segment in the drawing ( AB1)
Shg = AB1
back neck width AB1) and forward ( AB1) are equal. Figures 2 and 3.
Back neck depth - Figure 2.
From BUT down we retreat the depth of the neck, which is equal to the width of the neck ( AB1) divided by three and get a point IN.
AB = AB1/ 3 = 7 cm / 3 = 2.3 cm
The neck of the back must be drawn in a smooth curve through the points B, B1.
Front neck depth - Figure 3.
From BUT down we retreat the depth of the neck, which is equal to: ( AB1) the width of the neck plus an increase in the width of the neck, we get a point IN 2.
AB2 = AB1+ (Pshg) = 7 cm + 1 cm = 8 cm.
We form the neck of the front with a concave line, connecting the points B1, B2.
The construction of the sleeve - figures 4 and 5.
Armhole depth and sleeve length - Figure 4.
From A1 down we retreat the depth of the armhole, calculated by the formula (shoulder girth ( Op) divided by two) plus an increase in the girth of the shoulder ( Pop) we get a point G(see below).
A1G = ((Op) / 2) + (increment to the girth of the shoulder Pop) = (28.5 cm / 2) + 7 cm = 21.3 cm.
From points A1 And G to the right we build parallel horizontal lines with a length equal to the length of the sleeve ( dr) put points A2, G1 see figure 4.
For instance, A1A2 = GG1 = dr= 7 cm
We draw the line of the bottom of the sleeve with a straight line connecting the points A2, G1.

Construction of a curved section - Figure 5.
Measure from a point G down a segment equal to the length of the sleeve ( dr = YG1) put a dot G2.
YY2 = YY1= 7 cm
points G1 And G2 connect with an oblique line. Divide the slope in half with a point G3.
G3 = G1G2 / 2
Thus, it turns out that the segments G1G3 And G2G3 are equal.
From G3 to the left, we build a perpendicular with a length of 1 - 1.5 cm, put a point G4.
We draw the deflection section with a smooth curved line, connecting the points G1, G4, G2. So, as shown in Figure 5.
Line design: waist, bottom and side cut - pictures 6 and 7.

Expansion of the product along the waist line, bottom and construction of the side cut - Figure 6.
Along the middle line AN from point B down we put off the measurement - the length of the back to the waist ( Dst), we get T.
WT = dts= 38.8 cm.
On the bottom line from the point H1 to the right we extend the straight line by 8-12 cm, put H2.
H1H2 = 8-12 cm.
We build a side line with an inclined straight line, connecting the points H2, G2.
from point T building right horizontal line. Place points of intersection with vertical lines T1 And T2.
Making the waist and bottom line - figure 7
From points T2 and H2, we retreat 1.5 cm upward along the inclined vertical, set T3 and H3. Segments TT1 and HH1 must be divided in half and points T4, H4 should be marked.
We make out the waist line and the bottom of a smooth curved curve through the points T, T4, T3 and H, H4, H3.
Contour lines of the product - Figure 8.

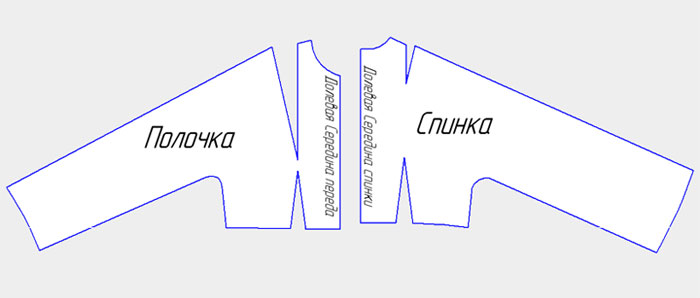
Outline the outline of the drawing of the dress pattern with the main solid line at the points V, V1, A1, A2, G1, G4, G2, T3, H3, H4 And H. When cutting, this part is a drawing of the back. Then we reshoot the front detail with dots on tracing paper B2, B1, A1, A2, G1, G4, G2, T3, N3, N4, N.
From one drawing we get de separate parts of the pattern - front and back.
Modeling the basis of the shoulder product of the dress.


Modeling the shape and neckline - Figure 9
Suppose you are not satisfied with the oval shape of the neck and you want to change it to a rectangular or V-shaped one, as the neck option is suggested in our example.
To do this, a new neckline should be applied to the pattern of the main pattern of the front and back, and the excess part cut off, as shown in Figure 9. When changing the pattern, it should be borne in mind that the shoulder width of the back GR should be equal to the width of the shoulder VP.
GR = VP
The neckline can be processed with undercut facings and left as is. It can also be trimmed with ruffles or a strap.
Modeling by changing the length of the product - Figure 9
The easiest way to model is to change the length of the product. If you want to shorten the length of the dress, draw a new line on the front and back patterns parallel to the bottom line at such a distance as you want to make the product shorter, cut off the excess parts.
If you need to lengthen the product, you can glue it to the front and back pattern from below additional sheet paper.
Then extend the fold and side lines on it, measure the increase in the length of the product on these straight lines, and then draw a new bottom line parallel to the previous cut, connecting the extended side and fold.
Cutting is a very difficult and responsible stage in the manufacture of clothes. If you make a mistake when cutting on the material, then it can not always be corrected. Before you start cutting the pattern, you need to check several times whether the parts of the parts are correctly located.

On the fabric, if the edge is hard and shaggy, it is better to cut it off, otherwise the fabric may shrink a lot over time.
Then you have to find front side according to the quality of weaving of the fabric on the edge and the brightness of the color. We determine the share thread (usually it runs along the edge or along the share fabric stretches less than in the transverse direction).
The details of the pattern are first laid out large, which are applied to the fold, and then the smaller details. Then we pin them with pins and reshoot the contour on the fabric and add allowances for the seams.
The size of the seam allowances and the hem of the product is determined by the type and purpose of the seam, as well as by the degree of crumbling of the processed section of the part in the product. Cut the fabric exactly along the drawn seam lines.
Oblique inlays are cut out at an angle of 45 degrees with respect to the equity line. If the length of the material for the oblique inlay is not enough, then it is cut out from several parts. If there are shreds left after cutting, do not rush to throw them away, they can be useful for processing loops.
After cutting out the details, before removing the paper patterns, you should first mark them in any way convenient for you so as not to confuse the details from the fabric.
Another hot topic of the season: long one-piece sleeve.
Having mastered this technique, you can easily model different styles of clothes with a one-piece sleeve, regardless of the season, type of fabric, etc., guided only by your desires or tasks.
When designing a long one-piece sleeve great importance has an angle of inclination of the upper cut.
With a slight slope or with its complete absence, when top line the sleeve runs horizontally (at right angles to the lines of the middle of the back and front), the bodice of the product will have a rather large volume, a softer shape with slack in the armhole area.
With a large slope of the upper cut of the sleeve, the bodice will have a strict, clear shape in the shoulder and armhole area. Freedom of movement in this case is provided by a gusset, a detachable barrel, and other constructive techniques, which we will consider in the following articles.
The width of the sleeve in this design is directly dependent on the angle of inclination of the upper cut and the depth of the armhole. The widest sleeve can be obtained with a minimum angle of inclination of the upper cut and a recessed armhole.
In this article, we will consider one of the options for constructing a bodice with long one-piece sleeve without gussets (kimono), in which the upper cut is a continuation of the shoulder line.
This design is based on a drawing of a pattern for the base of a dress with a semi-adjacent silhouette. If you need to achieve a looser cut, you can increase the free fit allowance by distributing it evenly between the areas of the base mesh (back, armhole and front).
If you have not yet built a dress base pattern for yourself, you will need this drawing in the future when mastering the modeling of various types and styles of clothing.
Let's copy on a blank sheet of paper the back and shelf of the bodice of the base of the dress. There is no need to transfer all letters and auxiliary lines. Copy only those letters and lines that will be involved in the construction. Look at our drawing and the situation will become clear.
Before proceeding directly to the construction of a one-piece sleeve, it is necessary to fulfill the main condition:
To do this, draw a line from point G4 down to the intersection with the waist line. Together with the side line, we transfer the side tuck, as shown in Fig. 2.
In our drawing, point G4 is located in the middle of the width of the armhole. If you are using a base built using a different technique, divide the width of the armhole in half and draw a vertical line from the division point, thus obtaining a new side line of the bodice.

Rice. 2
And one more important note. When designing a soft bodice with a long one-piece sleeve, and this is just our case, the size of the side tuck solution must be reduced to 1.5 cm in each direction. That is, the distance T2T3 \u003d T2T4 \u003d 1.5 cm.
Correcting the tuck solution. See fig. 3.

Rice. 3
Note:
The darts on the waist line of the back and front can be reduced, replaced by gathers or tucks (according to the style of the product).
In products of straight, free forms, tucks at the waist may be completely absent.
Back
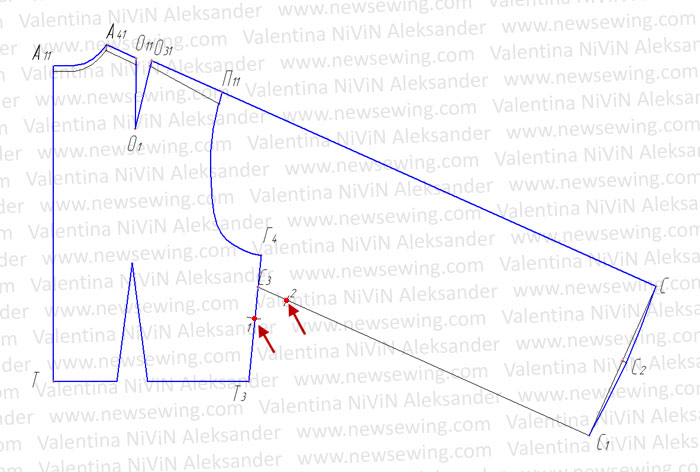
To provide additional freedom, we move the line of the shoulder and the neck of the back up as follows:
From point A, set aside 0.5 cm upwards and set point A11;
From points A4, O and O3 we set aside 0.7 cm upwards and set points A41, O11 and O31, respectively;
From the point P1, set aside 1.5 cm upwards and put the point P11.
These values may slightly fluctuate in one direction or another, depending on the tasks, on the type of product, on the fabric used and other factors. As an example, we use the most commonly used values in our practice.

Rice. 4
We connect points A11 and A41 with a smooth curve, while obtaining a new sprout line.
We connect sections A41 O11 and O31 P11 with straight lines, continuing the shoulder section to the right for a distance equal to the measurement of the length of the sleeve. In our example, the sleeve length is 58cm.
Thus, we set aside 58 cm from point P11, and you - your measure of the length of the sleeve, and put point C.

Rice. five
Note:
1. The tuck on the shoulder line of the back can be reduced or completely absent.
2. If the model assumes shoulder pads, the shoulder section is additionally raised according to the thickness of the shoulder pad.
The width of the sleeve is determined by the model (style) of the product. If you sew for yourself, the width of the sleeve will depend only on your desire. If you are sewing for your client, you will have to listen to his desires.
From point C down at a right angle to the upper cut of the sleeve, we draw a straight line, on which we set aside the width of the sleeve plus 2 cm and set point C1.
SS1 \u003d Shr: 2 + 2cm \u003d 36: 2 + 2 \u003d 20cm, and you make the calculation based on your data.

Rice. 6
Segment CC1 is drawn with a smooth curve. To do this, we divide the distance CC1 in half, set the point C2, from which we set aside 0.5 - 0.7 cm to the right. Smoothly connecting points C, C2 and C1 we get the line of the bottom of the sleeve.

Rice. 7
From point C1 to the left, parallel to the upper cut (for a straight sleeve), we draw an auxiliary line until it intersects with a side cut. The point of intersection is denoted by the letter C3.

Rice. 8
IMPORTANT! In this design, the distance Г4С3 should not be less than 3 cm. If in your case this distance is less than 3 cm, you need to lower the C3 point down the side cut to the required value.
Note.
Point C3 can be located anywhere on the side cut of the bodice, even at the waistline.
In our example, the sleeve is straight, so the line C1C3 runs parallel to the top cut.
We continue building.
To the right and down from the point C3, set aside a distance equal to the segment G4C3 and set points 1 and 2. See fig. 9. This construction is conveniently done with a compass, using a point C3 as radius.
Rice. nine
We finalize the line of the lower cut of the sleeve and the side line of the bodice with a deflection between points 1 and 2. See fig. 10. In this area, after cutting, guy line.

Rice. 10
If the product is cut along the waist line, in this case, to ensure freedom of movement, it is necessary to lengthen the side cut of the bodice by about 1-1.5 cm. This is done in the following way. From the point T3 down on the continuation of the side line, set aside 1-1.5 cm and set the point T31. We draw the waist line with a smooth curve, connecting the points T31 and T.

Rice. eleven
Shelf.
We reduce the solution of the chest tuck by 2 cm. We use compasses to build. From point G7, as from the center, we draw an arc to the right through point B9. Then we put the leg of the compass at point B9 and with a radius equal to 2 cm we make a notch on this arc, we denote the intersection point with the letter B91. We connect the points G7, B91 and get a new tuck line.

Rice. 12
Now we reduce the shoulder line by the same distance (2cm). To do this, from the point P5 to the right along the line of the shoulder, set aside 2 cm and put the letter P51. We connect points P51 and B91 with a straight line. We connect points P51 and P6 with a smooth curve.

Rice. 13
For further construction, close the chest tuck (for the duration of construction) and open it at point B3. You can open it in another place, for example, in a tuck on the waist line (this is not important).
To do this, we connect points G7 and B3 with a straight line, cut the shelf along this line and close the chest tuck, combining points B91 and B7, and at the same time open the tuck along the line V3G7. See fig. fourteen.

Rice. fourteen
Raise the edge of the shoulder up by 1 cm. To do this, from the point P51 upwards on the continuation of the line of the armhole, set aside 1 cm and set the point P52.

Rice. 15
We connect points B3 and P52 with a straight line, continuing the shoulder section to the left for a distance equal to the measurement of the length of the sleeve and set point C4. In our example, the sleeve length is 58cm.

Rice. 16
From point C4 down at a right angle to the upper cut of the sleeve, we draw a straight line, on which we set aside the width of the sleeve minus 2 cm. and set point C5.
In our example, the sleeve width is 36cm.
S4S5 \u003d Fr: 2 - 2cm \u003d 36: 2 - 2 \u003d 16cm You make the calculation based on your data.
Segment C4C5 draw a smooth curve. To do this, we divide the distance C4C5 in half, set the point C6, from which we set aside 0.5 - 0.7 cm to the right. Smoothly connecting points C4, C6 and C5 we get the line of the bottom of the shelf sleeve.

Rice. 17
I draw your attention to the difference in the design of the line of the bottom of the sleeve on the back and on the shelf.
If on the back, with the help of the smoothness of the bottom line of the sleeve (section CC1), we added 0.5-0.7 cm, then on the shelf, on the contrary, we “cut off” the same value, forming a concavity of the bottom line of the sleeve (section C4C5).
See fig. 7 (back), fig. 17 (shelf).
From the point G4 down along the side line of the shelf, we set aside a distance equal to the segment G4S3 on the drawing of the back and put the point C7.
We connect points C5 and C7 with a straight line.

Rice. eighteen
For the next step, we will use a compass. From point C7, as from the center, with a radius equal to the distance C7G4, we make marks on the lower cut of the sleeve and on the side cut of the shelf. Let's denote the intersection points as 3 and 4, respectively.

Rice. 19
In this design, the line of the lower cut of the sleeve smoothly passes into the line of the side cut of the bodice.
We finalize the line of the lower cut of the sleeve and the side line of the bodice with a deflection between points 3 and 4. See Figure 20. In this area, after cutting, guy line.

Rice. twenty
Note.
Point C7 can be located anywhere on the side cut of the bodice, even at the waistline. The main thing is that it corresponds to the position of the C3 point on the back.
IMPORTANT!
Before proceeding with cutting the fabric, it is necessary to check the length of the lower sections of the front and back parts of the sleeve for compliance and, if necessary, correct. The lower cut of the front of the bodice can be shorter by 1-2cm, this difference is compensated by the bracing.
We return the chest tuck to its original position. See fig.21.

Rice. 21
Note:
The chest tuck in this design can be reduced.
If you are building a pattern for a figure with a small chest volume (in products up to size 48), the chest tuck may be completely absent.
I remind you:
If the product is cut along the waist line, in this case, to ensure freedom of movement, it is necessary to lengthen the side cut of the bodice by about 1-1.5 cm, similar to the back. This is done in the following way. From the point T4 down on the continuation of the side line, set aside 1-1.5 cm, put the point T41. We draw the waist line with a smooth curve, connecting the points T41 and T5.

Rice. 22
On this, the construction of a long one-piece sleeve can be considered complete. It remains only to add a few remarks, using which you can expand the number of options for the bodice on the same basis.
If you need pattern tapered sleeve, this can be done by moving the top and bottom slice lines as follows. From point C2, up and down, set aside ¼ of the width of the narrow sleeve. For example, if the width of the narrowed sleeve in the finished form is 24 cm, then from point C2 we set aside 6 cm each (24: 4 = 6 cm). The resulting points will be denoted by the letters U and U1, and we will connect the point U with the shoulder point P11, and the point U1 with point 2.

Rice. 23
In the same way we build a narrowed sleeve on the shelf.

Rice. 24
Now that's ALL! Construction completed.
The resulting drawing can be used as the basis of a bodice with a one-piece sleeve for further modeling. Using the methods known to you, on its basis you can create a wide variety of styles of blouses, dresses, robes, etc. For example, using various options for moving the chest tuck, etc.
Figure 25 shows two more options for different positions of the lower cut of the sleeve. Only the detail of the back is shown here, on the shelf the lower cut is built in the same way. If necessary, you can easily handle this yourself.

Rice. 25
This is just an example. Start from your goals and desires. Do not be afraid to experiment, but remember, the risk must always be justified. Check the pattern and only after making sure that this is what you were striving for, proceed to cutting.
Cut details
Rice. 26
There are other ways and techniques for constructing a long one-piece sleeve. We will talk about them in our next articles.
You will succeed!
Download in one file | turbobit | | |
The rights to this article belong exclusively to the author. Full or partial use of the materials of this article in electronic publications on the Internet is possible only if the following conditions are met:
Author information must be saved. In the title or at the end of the published reprint, the source www.website of the Internet resource "Sewing Master" with a direct, active, visible to the user, not closed from indexing by search engines hyperlink to this article should be indicated.
The publication of texts by newspapers, magazines or other replication outside the Internet is possible only with the written consent of the author.
Hello. I present the cut and tailoring of a dress with a one-piece sleeve. The whole process at each stage is quite simple, and any woman can do it.
The dress is made of satin stitch, with an admixture of lycra.
I carried out the construction immediately on the fabric. I showed how to make a pattern with a one-piece sleeve in a separate post, I am attaching the link.
We'll have to take a few measurements from the figure, because after all, the dress must be built according to the figure, and go ahead, cut - connect.
Croy
According to the method described, I drew just such a back with a fold. I must say that in the end I still made a fitting in the middle of the back and, if I had known about it in advance, I would have cut out the back with a seam in the middle.

I cut out the back, leaving allowances. I connect the slices immediately on the overlock, so I take an allowance of 7 - 10 mm. I did not make allowances for the neck, because it is obvious that I will deepen and expand the neck. There is an allowance of 3 cm along the bottom, the cooler wraps up strongly and if you bend it less, then the bottom can still wrap up.
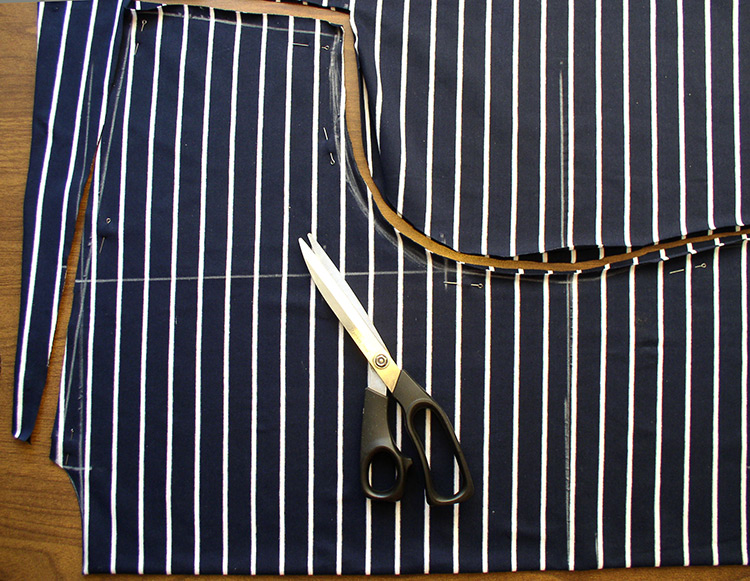
I apply the back to the folded fabric, fold to fold, pin up.
![]()
I am making changes for the shelf along the shoulder seam, i.e. lift from the neck. With a red line, I marked the shoulder line of the back.

I cut out a shelf

I deepen the neck of the shelf

I transfer the waist mark from the back detail to the shelf detail on both sides. The mark is needed to match the parts.

Sewing
In the center of the back, I took a tuck, making a fitting. Very often it is recommended to use a narrow zigzag for stitches on knitwear. Sometimes I follow this advice, but mostly I sew a regular straight stitch. It seems to me that such a line is quite elastic.

The shoulder and side seams are connected with an overlock.

The neck is processed with turning. The edge of the facing was bent and had to be hemmed by hand with blind stitches.

The bottom of the sleeve is double folded and machine stitched.

There are a lot of options for sleeves for women's clothing. They are periodically modified, supplemented, one is replaced by another. Of course, fashion is hard to keep up with. But, the fact is that some models of sleeves can serve you well and present the figure in a favorable light.
One-piece sleeve dress: butterfly effect
A one-piece sleeve is one that is not separated by a seam from the back and/or front. It is impossible not to notice the models of dresses with a one-piece sleeve: firstly, they look very unusual and interesting, and secondly, they are currently quite relevant.
In a straight or flared dress with a one-piece sleeve, you will look like a light airy butterfly, your movements will become smooth, and your shapes will be pleasantly rounded. Almost any soft material is suitable for such dresses - silk, jersey, knitwear, knitted fabric, chiffon.
Who is the one-piece sleeve suitable for?
There are several categories of women who need to have dresses with one-piece short or long sleeves in their wardrobe:
- Ladies with a "rectangular", male figure. The "corners" will become less noticeable.
- Girls with a "triangular" figure. In this case, a one-piece sleeve will balance the top and bottom.
- Women who want to see their hands more elegant. By the way, such a sleeve is especially suitable for athletes who want to hide their muscles.
But a one-piece sleeve also has contraindications. Girls should not wear a dress with such a sleeve for lush, broad-shouldered, chubby, pronounced women with. They will make them even more voluminous and loose.
 |
 |
|
 |
 |
 |
 |


Pattern of a summer dress with sleeves
The length of the dress from the waist is about 60 cm. To model the front half of the dress, close the chest tuck, transfer it to the armhole. Deepen the front neckline by 1-2 cm. Extend the shoulder length by 29 cm and draw the line of the bottom of the sleeve with the cuff at a right angle. Cuff and hem allowance 10 cm (finished cuff width 5 cm). Round the sleeve to the side line.
Set aside 5 cm from the waist line and draw a horizontal line. Cut the pattern along the red lines, shorten the middle part of the set-in belt to the depth of the waist tuck.

Model the back of the dress as shown in Figure 2. To deepen the armhole line, cut the back horizontally and move it apart by 1-2 cm. Deepen the neckline by 20 cm and 1-2 cm along the shoulder line, draw the neckline. Take the sleeve configuration from the pattern of the front half of the dress. Model the set-in part of the belt in the same way as the front half. Additionally, model a vent 8 cm wide (4 cm finished) and 0.33 lengths of the skirt length.
Separately, cut on paper the undercut facings of the neckline of the front and back, 4 cm wide.

How to cut out a dress
To sew a dress, you will need 1.7 m of satin 145 cm wide, a hidden zipper 50 cm long, sewing threads.
Cut out the details of the dress with seam allowances of 1.5 cm, along the bottom of the dress and sleeves - 4 cm. 